I have completed the gypsy and we are very pleased how she came out, in fact she is both myself and my hubs favorite, for the time being at least.
 This is what she looked like when she came to live here, skinny, scrawny and scarred
.
 Still, I could see the potential she had.....
 It took me awhile to mull over how to restore her beautiful black locks but I figured it out. The first thing I did though was attempt to dye some mohair, I tried twice with the black fabric dye but to no avail. It worked great if I wanted dark grey hair but not for the black. I ended up with regular hair dye, (thanks, Marnie!) worked like a charm! Here she is with her braid portions being glued on, I used the ace to steady the bunches of hair while it dried, doesn't she look gangsta?
 What was left of her part was next to nothing, the top of her head was thinning and flat, so my plan of action was to glue one side of the part down and after it dried, glue the other side the same way. Once that side was dried I flipped it and glue it again.
The first side.....
 The second side drying.....
This is one of the prettiest dresses to work with, all boudoir doll have some silk on them be it a shirt or a turban or the whole dress as in mine. Well, I could not replace the sheer black lace that was originally on this dress so I picked something more sturdier. This lace started out white, black lace is hard to find at a reasonable price. Anyway, I have black fabric dye so I thought....hummmm that will work. Wrong-o! The lace has a base of polyester so therefore the dye took to a grey color. Spray paint to the rescue! Some may think this to be a bad idea but "Le me tell ya," once the lace was hand stitched on, the red of the skirt flared like it is supposed to with a stiffened slip. So beautiful
.
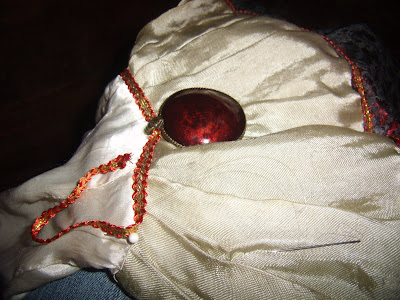 I decided on this red and gold trim because I have the red and gold going on, it matches wonderfully. I stitched it on each sleeve, each layer of the skirt and around the neck. My main embellishment was strung through the trim because it is very heavy.
Remember what the face of the gypsy looked like? She had several cracks around her right eye, well, let me tell ya...the worst one to repair was the one that went from the right eye to the left. The edge of the finish had started to curl upward so no matter how many coats of paint I hand rubbed or how many times I sanded, it wasn't enough. There was a constant shadow. I snapped a picture of the first layer of paint, all the cracks did fair except the darn one in the middle.
 Needless to say...it took about 12 to 15 layers of paint before I was satisfied with how she looked. These are the same cracks on her one hand, they didn't fair so well with the coats of paint as I discovered the more I slathered on the more to definition of the fingers, disappeared. *sigh*
 Did I mention my boudoir doll is marked? It has a W-K- and something that either is a inches mark or at one time, the number 14. I'll have to do some research on them.
 I did not retouch her eyes except to paint lower lashes, the red corner dot and line the upper lid, there was not anything wrong with her eyes except for a little dust.
 I'm so happy with her color, her base was beautiful to work with and it was hard for me to stop working on her. I haven't even paid to many visits to my blogger friends! Not to worry I'll be around soon.
 You would have to know where she had cracks to see the flaws as they are slight.
Ha! I almost forgot to post! I have been so wrapped up with the Gypsy doll. I found my wood putty had not dried overnight so I proceeded to make the underclothes. I couldn't quite find the fabric that is used for these dolls so I ended up with cheesecloth, I'm not that happy with it but my only other choice was fusible bonding and I thought that might not be good after a few years.
 Here are some, if not all, embellishments I plan on using on her dress, I wanted more of the gold hoops on the left but Goodwill was all out of them within a few days.
That will teach me to buy them all next time. C&G Design
I thought I would start on the gypsy boudoir doll, I really couldn't help myself, it seems like it's been waiting soooo long. She is in alright condition but maybe not a easily repair condition. She has eyelashes that protrude out from under the lid. Can you see one is lower than the other? That's because of the crack and the shifting of the composition. I think this little lady was dropped rather than the hot-cold temperatures of storage.
Today is the day I reveal my latest restored doll and I must say that she is actually a boudoir doll from the 1930's or 1940's. Here is what she looked like when I first saw her. This is what she looks like now.
Now came the moment of excitement, time to assemble my recent doll project. I removed all the wrappings i placed on her to protect her from painting and decided the arms would do better if I re-attached using a bias. Bias is cut on a angle to the warp and weft (the weave) and it provides extra strength. Can you see the stuffing coming out from under the shirt? This stuffing is placed on top of a under dress that had attached sleeves and skirt. A silk white dress. Instead of using the desegregated silk dress that's underneath, I stitched everything to the decorative over vest. I also found the shoulders had thick stuffing too
.
 This is the point I start going "awww" because it's come to the pleasure of seeing it all form together.










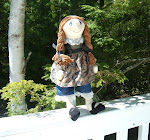

 This is what she looked like when she came to live here, skinny, scrawny and scarred.
 Still, I could see the potential she had.....
 What was left of her part was next to nothing, the top of her head was thinning and flat, so my plan of action was to glue one side of the part down and after it dried, glue the other side the same way. Once that side was dried I flipped it and glue it again.
 The second side drying.....
 Here she is with the finished hair-do, we decided she would look more like a gypsy if we left her hair loose, unfortunately this wasn't decided until after the pony braid were glued other wise I may of made long hair all the way around. It's not bad to stick with the original doll though.
 I used the former skirt lace as a side tied scarf, adding more mother of pearl shells to the loose ends. Like her earring? They also match the embellishment around her waist.
 Here is the natural flare of her skirt.
 A beautiful side view.....
 And a close-up of her eighteen bracelet bangles in the copper and gold. Don't cha wish that was the current style?
 Her hair is the softest feeling mohair I have felt, I'm to never return to fabric dye again. Smells good too.
 I like the way the shells reflect the light.
 For now she has a honorary spot next to Helen on the entertainment center (Helen is 26'', Gypsy is 30"). Hubs needs to make me another shelf!
 I call her Isabella, the gypsy boudoir doll. C&G Design


