Monday, June 30, 2008

Composition Toddler, Arms, Part 4

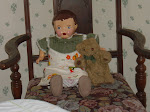
At the time of writing this post I find myself done with removal of the paint from my composition doll. The arms were rather difficult to do because of the obvious fingers but I managed to keep them all in tact! I was really surprised to find the arms are totally different from the other hard parts of my toddler. The color of the composition doesn't match up with the others and I suspect the arms were made at a different factory.
The material is sticky and by the time I was done, it had the texture of snakeskin.

The arms may pose the biggest challenge of reworking this doll, although I've developed a secondary problem. The doll is drying out and as it does, she's managed a crack under her chin that runs the length of her neck. I've kept on top of repairing it but I've discovered that less handling is better. Below is a photo of the first layer of putty applied to the arms, I'm in the process of a second coat. I'm hoping that's all she'll need.


Just sanding left. C & G Design.

Sunday, June 29, 2008

Kitchen Doors


Everyone knows Jack of all Trades and myself moved into our new house, right? For eight years prior to building we collected the interior things, toilet, windows, etc. It enabled us to build our house on the large size. One of the things we bought is a second hand set of cupboards, we had enough but hubby expanded the size of the kitchen.


Great, we need four custom made doors and they will probably cost more than the cupboards did.


Home Depot had custom made doors to order, needing four, meant, $300.00 + !


Least my dog won't be tempted anymore. Bad dog on occasion, suffers from separation anxiety when I'm gone all day.


We found a cabinet maker (friend of a friend), and gave him one of the smaller leftover doors to match up. We were expecting them after Christmas and surely before we moved in on Feb 2, 2008. Not so.....


June 26 th was the day we were notified they were done. The cabinet maker wasn't happy with his work so we could have them free OR he'd make them over.


It 's a no brainer!


Now....got to look through the vast paint cans for the kitchen stain again. C&G Design.

Saturday, June 28, 2008

American Girl


Every girl between the age of eight and twelve have asked for a American Girl doll. Madam P has two. Kirsten, the frontier girl that we acquired 3 years ago off eBay.


Kirsten is one of the original six dolls, we made her outfit with a matching coat.


Last year Madam P got "Nikki" for her birthday, she is a American girl doll of today and retired after 2007. Each American girl doll retails for $105.00 dollars and comes with a short story book.
Madam is just as happy to fashion with Happy girl (left), purchased at a flea market, and tolly doll (right), a Walmart knockoff, named "Rose". All have many fun times together. All are 18 inches.
Makes it easy when sharing clothes. C&G Design.

Friday, June 27, 2008

Composition Toddler-Undergarments, part 3

Still working on the arms....seems to be going slowly. Good thing there isn't much to them. Meanwhile, to break up the constant scraping, I've moved onto the undergarments.

I really did not know where to start with the costuming of this doll. I had a general idea what fabric I wanted and located it in two days. I know she needs pantlets, slip, dress, socks, shoes, and maybe a bonnet. This is of my source of inspiration, the t-shirt she was wearing when I bought her. It isn't original to her but old, and I couldn't see throwing it away.
The t-shirt rest just below the breastplate of my doll, finding a sheer white or ivory fabric would be ideal. I'm thinking the best thing to do is stitch the lower half of the slip onto the t-shirt. The fabric I found for both the slip and pantlets is indeed sheer, it has heavy thread lines that run through it. You can see it in the next picture of the panties. I made the legs longer but found some wide lovely lace, so I shortened them.
When thinking about the attire as a whole, I definitely wanted everything to match, decorative stitching in matching pink thread would do. I blanket stitched a hem for the waistband and chain stitched the lace on the legs.

I also placed a running ribbon through the lace so I could tie the pantlets closed around the legs, making a gathered look.

I forgot to mention why I started with the pantlets instead of the slip, The length of the pantlets determined the length of the slip.........the length of the slip determines the length of the dress.........I may make the socks long enough to be under the pantlets, I don't know yet.........
Moved onto the slip, it was definitely more enjoyable then the pantlets. I used double the fabric for the pantlets and placed a gusset in the area of tightness, the crotch. Because this doll has legs towards the front of the body, the panties needed a gusset to make it form fitting otherwise I'd have real baggy pantlets and I didn't want too much material under the dress. I had good success stitching the bottom part of the slip to the t shirt, I was worried it would stitch to tight and tear when removed but it turned out alright.
I pleated the bottom of the slip twice and embroidered the blanket stitch to each pleat.
She doesn't look bad in her unmentionables, does she? I have most of one arm striped and I'm trying to post on her every third day, Maybe soon enough I'll be ready to paint. Oh, too excited about that! And having her clothes ready! A post on shoes may be next, hope all goes well with the rest of the arms.
Stitch in' Britches. C&G Design.

Thursday, June 26, 2008

Kits

I recently took Madam P shopping to celebrate the end of the school year. She received 4 awards including one for exceeding the standard in the class, (all year) and the standard on her MEA'S (Maine Education Assessments) from the national "No child left behind" policy. Yeah! I thought that meant more than a ice cream trip.


One of our favorite things to do is rummage around in the odd ball shops, small trading places, hospital auxiliary stores, etc. Madam found something exclusively her own. A one paneled kit. It's a cute one.

This is what caught her eye, a topsy turvy doll and she immediately bugged me to buy it for her. Well, this shop has a dresser full of sewing items and on this day, one drawer was full of patterns. Every doll, and Christmas ornament for the eyes to behold! I put her off for a few minutes.


She was so excited and impatient, she kept asking over and over if she could have it.


After I selected my ten patterns at 99 cents apiece, I looked at her panel, it had a PUMPKIN on it. What!?!


Okay, peasant Cinderella with pleasant Cinderella, prince charming, fairy godmother, and the pumpkin with a working door! Yes, you can have it.


Good thing she found my stuffing bag....C&G Design.

Wednesday, June 25, 2008

Collectibles

It's Raggedy Wednesday, here a a couple of unique collectibles:


Plastic head gear,

A cartoon cell that aired on channel thirteen;


Halloween costume;


bendy dolls, like gumby......
Who irons anymore!
C&G Design....grateful for the dryer.

Tuesday, June 24, 2008

Composition Toddler-Notables, part 2

I have a few more details to talk about with my toddler doll. Sometimes it's difficult when doing a post to include everything especially when it involves repairs.


I call my composition doll a toddler because a toddler doll is defined as having half limbs, knees that stop after the knee, and arms that stop before the shoulder. The size matters when it comes to being a toddler, chubby legs separate this doll from a infant composition doll such as Bubbles. A bent limb baby by Effanbee.


Another know fact about the toddler doll, it's also referred to as a Mama doll and it's the reason I purchased her in the first place. Early composition dolls were made with a crier implanted in the stomach. Most criers, if found today, don't work. In it's time, and when brand new, the doll could be turned over and it made a sound like "mama". The crier is a whistle placed inside a hollow sliding tunnel. When the doll is flipped over and over it creates a sucking wind blowing within the whistle mechanism, thereby making the cry. Why almost all criers do not work today is beyond any one's knowledge, there isn't much to malfunction but they always fail. If you enlarge the picture you'll see the outline of my crier. I thought I would take the body apart but since it's in such great shape I've decided to not make this repair. I believe my doll is stuffed with a cotton byproduct which makes the torso very firm, I'll never be able to repeat that. The byproduct is called kapote, it's made into carpet underlayment today.


The other detail about this doll and my repair, it's an embarrassing one, I mistakenly discovered while doing the legs that my utility knife made marks in the white wood putty. Perhaps I could cut the wood putty down using the knife! It would shorten my sanding time! I should of known that from the early teachings of my Aunt Marion who did ceramic, she had us smooth the mold seams of the unfired object by using a bladed knife. (Boy, she was brave!) It was the first step before painting and firing, how could I forget! I did such thing with my doll and I'm progressing with the holes on the head.

For 12 years I have believe my girl doll was a boy, not true. I found while looking at her fingers, she wears matching nail polish, matching to her lip color. Early composition dolls were made from the same generic mold and were sold as either, or. For twelve years I had one vision for a outfit, beige, one piece, short set with white trim and a matching hat. I find myself researching dresses of the same period and it is soooo hard to decide.


I wanted to mention something about collecting these prize possessions, a seasoned doll person would look at the condition of the toes and fingers. The limbs hold an important point of collecting. Most older dolls have issues with the smaller parts of the body, most are missing toes and fingers, or at least, may be chewed on. My girl has one missing toe (my dog had to be in the photo!) and a hole in the back of the opposite heel. These are the area that do not do well when dropped. The toes can be reconstructed, and if necessary, a hole can be drilled in to the area to accommodate a toothpick. This gives a base for rebuilding any didget.


Lastly, at the time of writing this post, I have only the arms left to strip. The legs went well although lengthy, the bottoms of the legs (shin) was quite a challenge, we all know a doll sits and the underside was in good condition. I had to be fairly aggressive in removing the paint, took time but it's done. I have a suspicion the arms are going to give me the most trouble, although the flesh color has faded and the arms are deeply crazed the paint is "baked". That's my next goal, to get the arms striped without cutting a finger off. (Hers not mine)!


Keep in touch. C&G Design

Monday, June 23, 2008

Dollhouses

If a hobbyist were to do ANYTHING in the hobby itself, they would choose a basic and make it a lifelong project. It's kind of like the train collector turning his/her basement into a rolling landscape of towns and country. The world have a working train, one that made stops, chugged steam out the stack and actually sounded "Choo! choo!"


That is my feelings on my dollhouse project, lifelong with working parts.


This is my dollhouse I purchased at a auction about twenty years ago, it managed to make it Thur 3 moves and being stored for about 15 years straight. In the meantime I have been given things for the interior, found things, made things and bought things. As I mentioned, it is a lifetime project of mine.


The photos to the left is the master bedroom, it is the only room that indicates what the previous wanted for the windows. A intricate hand carved inserted pane. The one on the right is the hallway or landing from the stairs. I felt this area is a all purpose room and decided to make it the craft area. You can see the spinning wheel on the back wall and the sewing machine on the left.


Here is the nursery, not quite sure what I'll do to fit two children in there but I sure I manage. The photo on the right is the bathroom, it's the far room on the lower level and quite large for a bathroom. The only other option is to have the bathroom at the top of the stairs. I didn't quite figure that would work as there isn't any privacy.


The last room are the kitchen and living room, they are my favorite area of the house. All rooms are connected with a passage, all but the attic which is shown in the large picture. I'm looking forward to finishing the kitchen, it is a space under the deck and stands out from the other rooms. There is a lot of possibilities with placement of the cupboards. Do you see the old fashioned stove? It even has a rod that lifts the hot burners.


Madam P gave up her rustic twig set to have the lovely spot atop the decking she spent about two hours to the house the night we set it up, I had to pull her away for bedtime.


My dollhouse is at the stage where I'm going to decide what the interior walls and floor will look like, I know it will be papered and the high traffic rooms, kitchen and bathroom, will have tile. I'm considering a hardwood looking floor for the others, including and trim of stenciling to match the paper. Right now I'm stuck......wiring for the working lights needs to be placed before anything and I do NOT have a clue what kit to buy. Lamps and ceiling lights need to be counted and then maybe Jack of all trades can give me a hint about required wattage. My house does have a non electric working part, it's the "player piano" behind the stairs.


Good ole' fashioned music box. C&G Design.

Sunday, June 22, 2008

Pennies

The poor retailer that sold me this table cover was delighted to see it gone. He'd picked it up from three different places in the shop and put it back where it belonged, 3 times that day!
Penny rugs or penny covers, (table and dresser runners)is a very old technique used back in the 1800. The frontier women pined away their time by hand stitching scrap wool pieces together to make this unique room decor, it was while waiting for the husbands to return from the fields and it filled endless hours of stillness.

Most people like the idea of these antique pieces but most people aren't sure it would fit in their homes and I must admit, they work better if you had a fondness for primitives.


There really isn't a shortcut to constructing a penny rug or cover. The appliqued layers are commonly hand applied using the blanket stitch, although I prefer the feather stitch for a better sturdiness.

Modern time reproduction have evolved to include the last motif as a flower, heart, star, or button.

Whatever your icon be sure you like the penny for the penny.


And not for your thoughts. C&G Design.

Saturday, June 21, 2008

Composition Toddler, Part one

I have never worked with composition dolls, I think they are beautiful and full of history. The composition doll was promoted as the unbreakable doll, for a period of time, sales of the doll overtook the sales of a porcelain dolls.

Composition dolls are pricey if found in excellent shape, crazed or peeling dolls are more affordable and I'm always on the look out for them. This is my first one I bought about 12 years ago. She is in very sad shape. She was crazed when I purchased her and at the time I figured I'd order composition filler. It is a solution painted on the doll to prevent peeling. I never did.


The problem with composition dolls is the humidity and temperature changes. Even though you could drop this doll on the floor and it would literary bounce, it didn't tolerate being close to temperatures that dip and spike. Mine has been in storage for 8 years, unseen but not unthought of.


Well, I decided I would remove the layers of paint and see what I had, maybe I could start over....I'm assuming the white color is a crude wood putty used to blend the two half of the heads together. Composition is a material made of wood chips blended with glue then press into molds. The back of the head is attached to the front part of the face.

Most of the peelings came off easily, I had some spots I used a utility knife , I'd catch the open edge of the paint then snap it off. It saved me from scraping and maybe gouging too deep. I had chips smack me in the face, get stuck in my hair, and find a quick trip down my shirt! Not a bad result though......neat material.

Problem.....I stored my toddler in a smaller box, really to snug to fit this work of art in.......over time the pressure from the cardboard caused a stress fracture on top of her head. I felt lucky though, I ended up with two pieces, all in all, she could of been worse. Since I'd never worked with composition before, I decided to try to repair her pieces before painstakingly moving on to the arms and legs, they are in better shape and it will mean more utility knife.


Okay....not real sure how to repair composition, I've chose to use a high quality wood glue, cabinet grade, and wood putty for the holes and imperfections. I'm sure there is a better method but I want this technique, might work.....

I started by doing something I learned long ago. Wad a current page from a newspaper and place it in the head, do this when assembling any doll, it dates it and in my opinion, just a nice thing to do. My newspaper for this doll dates the repair and yes, the head has a opening out the neck.

Not only did the storage box cause my doll to break it also twisted the molds from one another. I had to place my pieces as close as I could, then clamp her poor head. Once the parts got tacky and stable I put another clamp on her head to achieve the right shape. Looks like torture.


I could hardy wait to take the clamps off and start to fill, how exciting for me! I busied myself with cleaning the house just to keep occupied, checking my work every fifteen minutes, seemed to be working. Ead gads, if I remove the clamps to early...I'll have to start over. If I putty too early, it might not be stable and fall apart the next day! OH, I MADE myself wait.


After all the energy was put into removing the original paint, after all the anticipation over the drying glue.....It took me about 20 minutes to fill the holes and some of the imperfections. I must say, she came out better than I expected. I'll do a light sanding and another coat of putty. After a complete sanding, I'll dilute the putty with water and brush lightly over all parts, it fills the small chips and causes a smoother appearance. Missed areas and dings will stand out like a spotlight once painted, do as much as you can before then, it's well worth it. Boy! She looks like she has the worse case of poison ivy!


Off to the arms and legs.....


Stay tuned. C&G Design