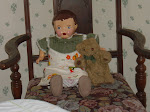
Now came the moment of excitement, time to assemble my recent doll project. I removed all the wrappings i placed on her to protect her from painting and decided the arms would do better if I re-attached using a bias. Bias is cut on a angle to the warp and weft (the weave) and it provides extra strength. Can you see the stuffing coming out from under the shirt? This stuffing is placed on top of a under dress that had attached sleeves and skirt. A silk white dress. Instead of using the desegregated silk dress that's underneath, I stitched everything to the decorative over vest. I also found the shoulders had thick stuffing too
.
 This is the point I start going "awww" because it's come to the pleasure of seeing it all form together.
Happy , happy birthday toooo.......
 Debbie!!!!!!!!!!!!
 C&G Design
Well, I was a little disappointed about the cracks showing in the paint, this photo has 2 coats of primer and 2 coats of yellow. Apparently the exposure has been lengthy and beyond a simple smoothing with sandpaper and paint. As I did with Mary though, I would be able to fill them with a rub of paint.
I'm working diligently on the composition doll I recently acquired off EBay, you can see I've striped all the finished off her head except at the neck. Notice all the exposure cracks have revealed a different pattern on the wood pulp itself. Tonight (Saturday) I have had to wait on further finishing this doll because it will take quite some time for the wood putty to cure.
 I'm also at the point where I need to really think about how to paint the head while having the clothing attached to the body, lots of straight pins, tape and ace bandages, I think. While the clothing look as if to be stapled I'll removed them to replace it with a strong glue.
Keep watching. C&G Design
It's Pink Saturday again, click here to arrive there. See the pink face on the big guy? That's what happens when he discovers a sensitive headset for xbox 360 that his parents told him there weren't any to be found, and they are on backorder everywhere. And this is the other pink face seconds later after discovering a DSI, a PINK DSI.
 What about this pink pillow propping up a pooped pouch, the new squeaky ladybug toy kicked his behind!
 C&G Design
 Merry Christmas and a Happy New Twenty ten! C&G Design
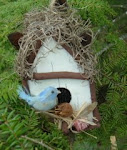
Since this is the busiest time of year, finding time to blog is becoming scarce. I want to share a re-post from last Christmas Eve. I made this cute little nativity 12 years ago. We had just started getting into a regular routine with the business... decorations were short so my son and I joined Dad (he was working on propane appliances in our yard!) outside in the chilly cold and used a few pieces of scrape wood to fashion this manger, the people were purchased at the dollar store as one set. Shortly after Christmas we found we were having a baby! This time is special to me and very unforgettable. Merry Christmas and Peace on Earth. C&G Design
This little cutie is the last of the free Annie doll's given away by Julie of My Raggedy dolls. This one is called Christmas Annie. We can see why she has that for a name, look at her peppermints, (high squeal!) and her dress is adorable with the gingerbread men and the complimentary snowflake fabric.I have all my toes and fingers crossed for me to win! C&G Design
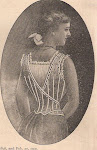
I can remember the early 90's (almost like yesterday), remember them? Remember Waldo, the skinny, geeky guy that wore stripes and hide amongst the world of people and you needed to search for him? This is Walda. Walda is the play on word from Waldo, why? Because Walda shows up everywhere, in your grandmother's attic, salvation army and prestigious antique places, you name it.
 Walda was named by Nurse Edna (doll collector of African Americans) on a EBay forum where the discussion had indicated she is a 70's, 80's doll being passed off as an antique masterpiece. I've even seen her in a reputable antique mall for $165.00, and she was situated behind glass!
 This is a ad I lifted off the net but in one of my craft magazines there is a graphic of her with the discounted price. I found it humorous because at the time I had parts of her.... I still have them! Anyway, the site with the ad relays the information about Walda being valued at about the same as she was then, $3.99.
 These are the two I have dressed in the brown but I do have other versions in different color dresses with different hair (yarn), But she always has the rendition of the face, hummmmm.....maybe in 100 years she will be worth what everyone thinks she is.
I won't be around, and you? C&G Design
So you can see what I have to work with, I de-attached the slip from the body and examined the trim. In doing so, I discovered pantaloons stitched to the body. The legs would be the perfect place to start. The fabric is very, very brittle. My first step is to reinforce the feet, it meant using muslin which is what the body is made of.
 I hand stitched pouches, attached the feet with the wire that was there before, flipped the muslin up and glued as much of it as I could before stitching the end down. The gluing adds strength, with out it I believe this method would fail rather quickly. I had temporary tape around the shins while the glue dried.
 Look at the situation with the upper legs, they had many splits in the lightweight gauze like fabric and the hay was continually falling out. Major help for the fabric was due.
 I fitted a white nylon tight around every part of my long legged lady. The top of the legs can be improved by adding more sawdust and stiffening up the joint. Although it's not the originally of the fabric, it is needed and very much durable.
 Now, let's shift to the trim, the trim is a lovely antique tatting. I have no idea how to tat so I will try my hand at a close reproduction out of crocheting.


 Instead of using the desegregated silk dress that's underneath, I stitched everything to the decorative over vest. I also found the shoulders had thick stuffing too.
 This is the point I start going "awww" because it's come to the pleasure of seeing it all form together.
 I hand stitched my imitation tatting to the bottom of the skirt.....
 and pleated the top of the skirt, I got the idea from her slip.
 Ta-da! My lovely doll is taking shape with her neck trim folded and stitched down....her waist trim hand stitched perfectly......
 and her slip with the pantaloons are hand sewn to her body.
 Now onto the wig.....this may take some time as I have to think about it. C&G Design


