I started my Sayco doll, and....she will take awhile, let me tell you how I have to go about this.
 I have read about two different hand methods to re-rooting a doll's hair, the first one entails removing the head and using a large sewing needle, sew through the holes to the inside of the head where you have a short tail of hair that comes out of the needle once you have made the stitch, come out the neck. Okay, I can't remove the head of my play pal, it has a insert neck joint and even if it didn't, I wouldn't want to remove it.
The second involves the other end of the needle, sellers on the Internet will talk you into a re-rooting tool and let me tell ya, wasting your moula! Basically it's a long needle with the eye cut off, leaving a "v" shaped notch. I have a bit of a rusty doll needle, so for me....the choice wasn't hard to re-purpose it. I used a awl on my doll because she is made of high quality plastic and will "mend" while poking with a smaller sized needle. You put hair in the notch of the needle, doubled size, use awl to reopen you hair hole, glue a dot and put hair, notch and needle through hole, up about 1/2 inch. When you pull the needle back, the hair will stay. It's time consuming and after a while I used rounded needle nose pliers to help insert the hair because it was rough on my hands. When I'm done re-rooting this doll I will cut my needle in half and put both parts in the empty spot of my awl. It will be easier to do a Barbie and I could use the notch in the awl itself.
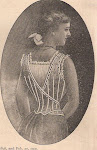
 I tried to post a photo of my Sayco doll with Auburn, she has been made with that color although rarer then brunette. Mine will be auburn and I'll go into more detail about the hair in a later post. The above photo is one row of bangs.
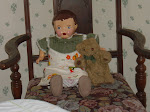
 This photo is four rows.
Did I mention I'm keeping track of how many holes it will take?
Yep. C&G Design


 These are new to me. I have a big tote of unfinished ceramics, nativities, animals, (don't forget the raggedies!) and these little snow babies. Cute.
 Very tiny features taking a steady hand and a keen eye. I know the really old snow babies are all white but I wanted a landscape to blend with a Christmas tree. We did the traditional red and green. I used a face paint that has a peach glitter in it hoping for a sheen (like it did when it dried on paper) and it does have a small sheen but not as much as I'd hoped for.
 I used this antique silver glitter from the Martha Stewart line and I kick myself for not purchasing more when it was on sale. It's so hard to find. It's so beautiful acting more like a diamond dust than glitter.
 Well, what in the world could I use to give these away in? I hadn't thought of that. It wouldn't be prudent to just hand 'em over! Geez, I saw a perfect thing to use my newest stamp for and I really shouldn't go to Craftmania, especially now that I know they have scads of rubber stamps (just the letters) for like....$.99 to $2.99.
 A velvet drawstring storage bag with this cute tag will do the trick "From.....and the year" printed on the other side.
 They turned out so cute! They are very hard to photograph though. I tried and tried and tried. Every time the flash was on it looked as if the babies have all these empty spots. The glitter is just to shiny.

 Here she is with 4 complete, short rows. Next posting on Miss Sayco will explain the hair and how it behaves.


